
 Stefan Vaskevich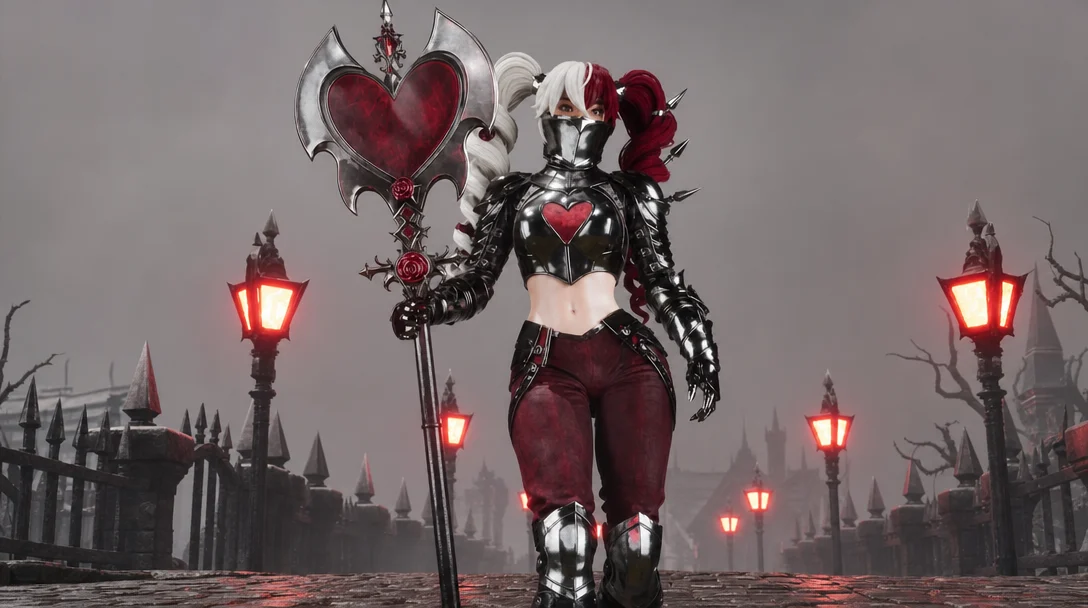
Tools used in this article




Can AI take one reference image all the way to a game-ready, rigged character? Yes - in a little over two days. This is the full breakdown of how Stefan built the Queen of Hearts: 60,000 triangles, fully rigged, walking through a lit Unreal Engine scene. You asked for the details, so this guide walks every stage in order: part separation, generation, sculpt fixes, retopology, UV unwrapping, baking, AI texturing, materials, realistic eyes, and rigging.
Treat it as the map, not the territory. Each step below tells you what happens, which tool does it, and the one or two decisions that actually matter. The video shows every click, and the final Blender file lets you examine the result from inside.
Watch the full tutorial
Every click of this workflow, start to finish, on YouTube.
1. From one reference image to generated parts
Extract the character in A-Pose and split it into parts
Everything starts from one reference image. First move the character into a default pose: Stefan goes with A-Pose, because it is easier to work with and AccuRig rigs it better later. The weapon gets separated immediately.
There is no prompt engineering here. He asks ChatGPT to write the prompt (“I need a prompt to extract my character in A-Pose on a white background”) and runs it in Nano Banana Pro or GPT Image 2. Both give clean, consistent extractions.

Decide per part: low poly right away, or high poly for baking
This is the decision that shapes the whole build. Hair, head, and small accessories are generated directly in low poly. That skips untangling merged hair strands later, and Tripo keeps the strands logically separated. The armor, pants, and greaves go high poly first, because their small folds and engraved details will be baked into a normal map on top of a clean low-poly mesh.
For low-poly generation, the polygon budget setting decides everything: about 5,000 faces for the head, as low as 500 for small accessories. For parts that need more control, add a multi-view reference. Models are generated without textures at this stage. Texturing comes later, and skipping it here saves tokens.

2. Assemble, sculpt, and retopologize in Blender
Assemble everything in Blender against the reference
Import all parts (FBX) and add the original image as a reference (right-click → Add Image → Reference), with the character’s feet on the ground line. Then it is plain fitting work: X-Ray mode to see through the mesh, and G / R / S to move, rotate, and scale each part into place. Keep the objects separate; nothing needs joining yet.
Symmetric parts are a huge time saver: position one glove, set its origin to the world center, apply rotation and scale (Ctrl+A), and add a Mirror modifier on X. You retopologize once, you texture once, and the modifier handles the other side until the very end.

Fix overlaps and shapes in Sculpt Mode (about an hour)
Where parts overlap (like the body under the pants), mask the area with the Mask brush, then run Mask → Mask Slice and Fill Holes to cut it away while keeping the mesh closed (a hollow mesh causes problems later). Clear the mask afterwards, or the area stays locked.
The workhorse is the Elastic Grab brush: half of the cleanup is just grabbing geometry and moving it like clay. Holding Shift switches any brush to Smooth, holding Ctrl inverts the action. If smoothing stops working after cuts and joins, the polygon density is off. Run a Remesh on that object (only on closed, non-hollow meshes) and the brushes behave again.

Retopology: AI for most parts, RetopoFlow where it matters
Hair, head, and accessories are already low poly. For the armor and weapon, AI retopology does the bulk: Tripo Smart Low Poly with a hand-picked budget (1,500 worked best here; max or min settings do a worse job), and Hunyuan 3D Studio retopology on Low with quads. Tripo currently returns the cleaner mesh but loses the object’s original position on export; Hunyuan brings the FBX back exactly where it was. Combine both and keep the best generation per part.
Where AI output is not good enough (Hunyuan struggles with fingers), the free RetopoFlow add-on fixes it fast: PolyPen to draw polygons, Strokes to repeat edge loops across a region, Loops to add missing divisions, Contours to ring fingers in seconds. A simple part like the face mask takes about five minutes fully manual. The finished character: around 60,000 triangles.


3. UV unwrap, baking, and AI texturing
UV unwrap like a tailor (about 30 minutes)
UV unwrapping is cutting the mesh into flat cloth. Put seams where a tailor would, along edges nobody looks at, and unwrap with Angle Based. Turn on the stretch display (Display Stretch: Angle) in the UV editor: red means stretched, and stretched means blurry textures. Separate strong appendixes like spikes and buttons into their own islands.
Hunyuan 3D Studio can AI-unwrap a mesh, sometimes badly, sometimes well, and its output is fixable: enable UV sync, select the bad island, clear its seams (Ctrl+L to select linked), add one long seam yourself, re-unwrap. Pack everything with the free UV-Packer add-on; it packs tighter than the native tools.
One organizational decision pays off across the whole pipeline: group the parts that will share a material (one for the face, one for accessories, one for body, armor, and weapon), then select each group together, unwrap together, pack together. One material, one texture, no overlap. That is what makes shared baking possible later.

Bake the normal and AO maps in Cycles
Baking is what makes the 60K-triangle model read like the two-million-polygon sculpt. In the low-poly object’s shader, create an image texture node (leave it selected), switch the render engine to Cycles (all baking in Blender is Cycles-only), open the Bake panel, type Normal, enable Selected to Active, select the high poly, then shift-select the low poly, and bake.
Green and yellow blotches mean the cage missed geometry. Tune Cage Extrusion until they disappear (0.01 was too tight here; 0.06 landed clean). To bake several objects into one shared map, keep the same image and material and disable Clear Image: each bake adds to the map, which works because the UVs never overlap. Tiny leftover artifacts? Texture Paint with a Smear brush is the cheat code. Bake Ambient Occlusion the same way, isolating other objects first so they do not cast shadows into the map.

Texture with AI: Tripo for the base, Modddif for control
The fastest route: upload the model to Tripo, add the original reference, and let it texture the whole object in one pass, often surprisingly good. For everything it gets wrong, Stefan moves to Modddif (still free, public projects only). Export the character as GLB with Apply Modifiers enabled; otherwise mirrored parts arrive broken.
The Modddif loop: drop in the same reference images used for generation, then go view by view: generate, project onto the model, and patch only the areas that are off. If an angle is missing, create a variation (“back side view”) and use it as a new reference. Modddif exports one color map per object; merge them into a single map in any layer editor, or hand the four images to Claude Code and let it do the merge.

Materials: PBR maps from a single image (the new trick)
A color map plus a normal map still is not a material; metal needs roughness and metalness. Tripo can generate PBR maps for the whole object, and it is worth trying. But the trick Stefan had not shown before: Patina on fal.ai turns one brushed-metal image (prompt courtesy of ChatGPT) into tileable roughness and metalness maps for a couple of cents.
Connect them in the shader with Non-Color set on both maps, press Ctrl+T on the texture node for instant mapping controls, and switch the coordinates to Generated if the UV tiling looks off. Because the armor pieces share one material, the brushed metal lands on all of them at once. For the Unreal export, bake roughness and metallic into UV maps the same way as the normal map: apply the mirrors, join the objects that share the material (rename every UV map to the same name first, or the join breaks the texture), and bake without Selected to Active.

4. Realistic eyes, AccuRig rigging, and Unreal Engine 5.8
Realistic eyes and eyelashes (the pro version)
Spheres with a texture work, but the professional look is a double sphere: take the eye from the free MetaHuman conform topology head (delete everything else), duplicate it, and make the outer copy transparent and extremely glossy. That shell catches the glare. On the inner eyeball, push the iris slightly inward with proportional editing, then map an AI-generated iris texture and nudge the UV into place.
Eyelashes: place the 3D cursor on the eyelid (Shift+Click), add a Single Vert, enable snap-to-face, and extrude the vertex along the lid into a curve; extrude the whole line once more into a strip. The lash texture is just an alpha mask: ask Gemini or Nano Banana for a “mask texture” (white opaque, black transparent), fit the UV, mirror to the other eye. Ten minutes, and the face stops looking like a doll.

Rig with AccuRig, then fix the weights in Blender
Export the character to AccuRig (free) and follow its guided flow: middle line, body markers, hand markers (it even asks how many fingers, so stylized hands rig fine), then Calibrate. Marker placement is the step that decides the quality; if the result is off, go back and move the markers. Ignore how the materials look inside AccuRig; it is just a preview, and you will reassign them back in Blender.
Back in Blender, test the rig in Pose Mode. Armpits dragging body parts along means weight fixes: select the armature, then the mesh, enter Weight Paint (that exact order), Shift+Ctrl+Click a bone to see its influence, and paint the strays down to zero. For hair and accessories there is a faster path: select them, pick the head bone, and Set Weight to 1, and the whole hairstyle follows the head with one command.

Drop it into Unreal Engine 5.8
The finished character goes into Unreal Engine: retarget the locomotion animations, add physics to the hair, and light a small scene for the beauty shots. UE 5.8’s toolset (MetaHuman integration, markerless motion capture, native MCP) makes this part move fast, and all of it is free.
What actually takes the time
A little over two days, most of it in Blender rather than in the AI tools. The AI stack removes the years-of-training parts (base meshes, textures, rigging math), and leaves you the judgment parts: what to keep, what to fix, and when good enough is good enough. Just a few years ago a character of this quality was out of reach for a solo creator on a deadline.
More on each stage: the full free character pipeline, the Modddif texturing review, the AI retopology showdown, and the character reference system this Queen of Hearts started from.


